![[BunsenLabs Logo]](/img/bl.svg)
You are not logged in.
- Topics: Active | Unanswered
#1 2026-09-16 21:57:45
- hhh
- Hercule Poirot

- From: Belgium
- Registered: 2015-09-17
- Posts: 17,479
- Website
(Wayland) Setup Noctalia, a shell for labwc, niri, mangowm, etc...
Noctalia is a shell that attempts to unify the desktop for Wayland window compositors. It is GTK/QT independent, it works with whatever. It's based on Quickshell and has a GUI that let's you configure a ton of options. It works with any wayland compositor and has no GTK or Qt dependencies.
For this I'm assuming you have a forky or sid install with labwc installed and the basic configuration files created (scroll down to "Configuration"). Don't install any desktop-supporting apps other than maybe network-manager (no volume-applet, clipboard, polkit, notifications, backlight, not even a menu like fuzzel or wofi). Don't install a display manager (lightdm, gdm3, sddm, nwg-hello, etc...)
Do install a browser, file manager, editor, a second terminal if you don't love alacritty, as well as pipewire, xwayland, xdg-desktop-portal-gtk, xdg-desktop-portal-wlr and pkexec.
Enable the Noctalia repo (NOTE!!! We're on either forky or sid, check the sid tab under Step 2: Add the repository!)...
https://docs.noctalia.dev/noctalia/gett … ian#debian
Run 'sudo apt update', then install the shell and greeter...
sudo apt install noctalia noctalia-greeter greetdHold off on configuring noctalia-greeter, we're getting there.
In ~/.config/labwc, change your autostart file to...
noctaliaNothing else. My environment file is blank (all commented out, it's the default). My menu.xml is minimal...
<openbox_menu>
<!-- Note: for localization support of menu items "client-menu" has to be removed here -->
<menu id="client-menu">
  <item label="Minimize">
    <action name="Iconify" />
  </item>
  <item label="Maximize">
    <action name="ToggleMaximize" />
  </item>
  <item label="Fullscreen">
    <action name="ToggleFullscreen" />
  </item>
  <item label="Roll Up/Down">
    <action name="ToggleShade" />
  </item>
  <item label="Decorations">
    <action name="ToggleDecorations" />
  </item>
  <item label="Always on Top">
    <action name="ToggleAlwaysOnTop" />
  </item>
  <!--
    Any menu with the id "workspaces" will be hidden
    if there is only a single workspace available.
  -->
  <menu id="client-send-to-menu" />
  <!--
    openbox default workspace selector
    to use replace above workspace menu with the example below
    the label is required, but you can change the text.

    <menu id="client-send-to-menu" label="Send to..." />
  -->
  <item label="Close">
    <action name="Close" />
  </item>
</menu>

<menu id="root-menu">
  <!-- Make client-list-combined-menu a submenu of root-menu
       You must supply a label or it will not appear in root-menu -->
  <!--
  <menu id="client-list-combined-menu" label="Running..." />
  -->
  <item label="Terminal">
    <action name="Execute" command="lab-sensible-terminal" />
  </item>
  <separator />
  <item label="Reconfigure">
    <action name="Reconfigure" />
  </item>
  <item label="Exit">
    <action name="Exit" />
  </item>
  <!--
  # A prompt can be used as follows:
  <item label="Exit">
    <action name="If">
      <prompt message="Do you really want to exit the compositor?" />
      <then>
        <action name="Exit" />
      </then>
    </action>
  </item>
  -->
</menu>

<menu id="some-custom-menu">
  <!--
    Creates menu title.
    To create an empty header with no text,
    set label=" ", not label=""
  -->
  <separator label="custom menu" />
  <item label="Reconfigure">
    <action name="Reconfigure" />
  </item>
  <item label="Exit">
    <action name="Exit" />
  </item>
</menu>

</openbox_menu>
And my rc.xml just has a couple of Noctalia sections added as per the instructions...
https://docs.noctalia.dev/noctalia/comp … ngs/labwc/
<labwc_config>

  <core>
    <gap>10</gap>
    <decoration>server</decoration>
    <adaptiveSync>no</adaptiveSync>
    <allowTearing>no</allowTearing>
    <autoEnableOutputs>yes</autoEnableOutputs>
    <hdr>no</hdr>
    <reuseOutputMode>no</reuseOutputMode>
    <xwaylandPersistence>no</xwaylandPersistence>
    <primarySelection>yes</primarySelection>
    <!--
      # See labwc-config(5) for details
      <promptCommand></promptCommand>
      # See labwc-config(5) for details
      <errorCommand></errorCommand>
    -->
  </core>

  <!-- Thumbnail-based window switcher -->
  <windowSwitcher preview="no" outlines="yes">
    <osd style="thumbnail"/>
  </windowSwitcher>

  <placement>
    <policy>cascade</policy>
    <!--
      When <placement><policy> is "cascade", the offset for cascading new
      windows can be overwritten like this:
      <cascadeOffset x="40" y="30" />
    -->
  </placement>

  <!-- <font><theme> can be defined without an attribute to set all places -->
  <theme>
    <!-- <name>Numix</name> -->
    <!-- <icon>breeze</icon> -->
    <fallbackAppIcon>labwc</fallbackAppIcon>
    <titlebar>
      <layout>icon:iconify,max,close</layout>
      <showTitle>yes</showTitle>
    </titlebar>
    <cornerRadius>8</cornerRadius>
    <keepBorder>yes</keepBorder>
    <maximizedDecoration>titlebar</maximizedDecoration>
    <dropShadows>yes</dropShadows>
    <dropShadowsOnTiled>no</dropShadowsOnTiled>
    <font place="ActiveWindow">
      <name>sans</name>
      <size>10</size>
      <slant>normal</slant>
      <weight>normal</weight>
    </font>
    <font place="InactiveWindow">
      <name>sans</name>
      <size>10</size>
      <slant>normal</slant>
      <weight>normal</weight>
    </font>
    <font place="MenuHeader">
      <name>sans</name>
      <size>10</size>
      <slant>normal</slant>
      <weight>normal</weight>
    </font>
    <font place="MenuItem">
      <name>sans</name>
      <size>10</size>
      <slant>normal</slant>
      <weight>normal</weight>
    </font>
    <font place="OnScreenDisplay">
      <name>sans</name>
      <size>10</size>
      <slant>normal</slant>
      <weight>normal</weight>
    </font>
  </theme>

<!--
  <windowSwitcher preview="yes" outlines="yes" unshade="yes">
    <osd show="yes" style="classic" output="all" thumbnailLabelFormat="%T" />
    <fields>
      <field content="icon" width="5%" />
      <field content="desktop_entry_name" width="30%" />
      <field content="title" width="65%" />
    </fields>
  </windowSwitcher>
-->

  <!--
    Many other kinds of content are supported in the window switcher like below.
    Some contents are fixed-length and others are variable-length.
    See "man 5 labwc-config" for details.

    <windowSwitcher preview="no" outlines="no">
      <osd show="yes" />
      <fields>
        <field content="workspace" width="5%" />
        <field content="state" width="3%" />
        <field content="type_short" width="3%" />
        <field content="output" width="9%" />
        <field content="identifier" width="30%" />
        <field content="title" width="50%" />
      </fields>
    </windowSwitcher>

    custom format - (introduced in 0.7.2)
    It allows one to replace all the above "fields" with one line, using a
    printf style format. For field explanations, see "man 5 labwc-config".

    The example below would print "foobar", then type of window (wayland, X),
    then state of window (M/m/F), then output (shows if more than 1 active),
    then workspace name, then identifier/app-id, then the window title.
    It uses 100% of OSD window width.

    <windowSwitcher preview="no" outlines="no">
      <osd show="yes" />
      <fields>
        <field content="custom" format="foobar %b %3s %-10o %-20W %-10i %t" width="100%" />
      </fields>
    </windowSwitcher>
  -->

  <!-- edge strength is in pixels -->
  <resistance>
    <screenEdgeStrength>20</screenEdgeStrength>
    <windowEdgeStrength>20</windowEdgeStrength>
    <!-- resistance for maximized/tiled windows -->
    <unSnapThreshold>20</unSnapThreshold>
    <!-- resistance for vertically/horizontally maximized windows -->
    <unMaximizeThreshold>150</unMaximizeThreshold>
  </resistance>

  <resize>
    <!-- Show a simple resize and move indicator -->
    <popupShow>Never</popupShow>
    <!-- Let client redraw its contents while resizing -->
    <drawContents>yes</drawContents>
    <!-- Borders are effectively 8 pixels wide regardless of visual appearance -->
    <minimumArea>8</minimumArea>

    <!--
      Set cornerRange to a positive value to increase the size of corner
      regions for mouse actions and diagonal window resizing. When omitted,
      the default size of the corner region is half of the titlebar height.

      <cornerRange>8</cornerRange>
    -->
  </resize>

  <focus>
    <followMouse>no</followMouse>
    <followMouseRequiresMovement>yes</followMouseRequiresMovement>
    <raiseOnFocus>no</raiseOnFocus>
    <!-- Delay (ms) before applying raise-on-focus. 0 = immediate. -->
    <raiseOnFocusDelay>0</raiseOnFocusDelay>
  </focus>

  <snapping>
    <!-- Set inner and outer range to 0 to disable window snapping completely -->
    <range inner="10" outer="10" />
    <cornerRange>50</cornerRange>
    <overlay enabled="yes">
      <delay inner="500" outer="500" />
      <!-- Specify whether to draw the snap overlay above or below the window being dragged -->
      <placement>below</placement>
    </overlay>
    <topMaximize>yes</topMaximize>
    <notifyClient>always</notifyClient>
  </snapping>

  <!--
    Workspaces can be configured like this:
    <desktops>
      <popupTime>1000</popupTime>
      <initial>Workspace 1</initial>
      <names>
        <name>Workspace 1</name>
        <name>Workspace 2</name>
        <name>Workspace 3</name>
        <name>Workspace 4</name>
      </names>
    </desktops>

    Or it can also be configured like this:
    <desktops number="4" />

    Or like this:
    <desktops>
      <popupTime>500</popupTime>
      <number>5</number>
      <prefix>ws</prefix>
    </desktops>

    Or:
    <desktops number="4" popupTime="500" prefix="ws" />

    popupTime defaults to 1000 so could be left out.
    Set to 0 to completely disable the workspace OSD.

    prefix defaults to "Workspace" when using number instead of names.

    Use GoToDesktop left | right to switch workspaces.
    Use SendToDesktop left | right to move windows.
    See man labwc-actions for further information.
  -->
  <desktops>
    <popupTime>1000</popupTime>
    <names>
      <name>Default</name>
    </names>
  </desktops>

  <!--
    <margin> can be used to reserve space where new/maximized/tiled
    windows will not be placed. Clients using layer-shell protocol reserve
    space automatically, so <margin> is only intended for other, specialist
    cases.

    If 'output' is not provided, the margin will be applied to all outputs.

    <margin top="10" bottom="10" left="10" right="10" output="HDMI-A-1" />
  -->

  <!-- Percent based regions based on output usable area, % char is required -->
  <!--
    <regions>
      <region name="top-left"     x="0%"  y="0%"  height="50%"  width="50%"  />
      <region name="top"          x="0%"  y="0%"  height="50%"  width="100%" />
      <region name="top-right"    x="50%" y="0%"  height="50%"  width="50%"  />
      <region name="left"         x="0%"  y="0%"  height="100%" width="50%"  />
      <region name="center"       x="10%" y="10%" height="80%"  width="80%"  />
      <region name="right"        x="50%" y="0%"  height="100%" width="50%"  />
      <region name="bottom-left"  x="0%"  y="50%" height="50%"  width="50%"  />
      <region name="bottom"       x="0%"  y="50%" height="50%"  width="100%" />
      <region name="bottom-right" x="50%" y="50%" height="50%"  width="50%"  />
    </regions>
  -->

  <!--
    Keybind actions are specified in labwc-actions(5)
    The following keybind modifiers are supported:
      W - window/super/logo
      A - alt
      C - ctrl
      S - shift

    Use <keyboard><default /> to load all the default keybinds (those listed
    below). If the default keybinds are largely what you want, a sensible
    approach could be to start the <keyboard> section with a <default />
    element, and then (re-)define any special binds you need such as launching
    your favourite terminal or application launcher. See rc.xml for an example.
  -->
  <keyboard>
    <!--
      # Numlock is not set by default
      <numlock>on|off</numlock>
    -->
    <layoutScope>global</layoutScope>
    <repeatRate>25</repeatRate>
    <repeatDelay>600</repeatDelay>
    <keybind key="A-Tab">
      <action name="NextWindow" />
    </keybind>
    <keybind key="A-S-Tab">
      <action name="PreviousWindow" />
    </keybind>
    <keybind key="W-Return">
      <action name="Execute" command="lab-sensible-terminal" />
    </keybind>
    <keybind key="W-q">
      <action name="Close" />
    </keybind>
    <keybind key="W-s">
      <action name="Iconify" />
    </keybind>
    <keybind key="W-a">
      <action name="ToggleMaximize" />
    </keybind>
    <keybind key="W-d">
      <action name="ToggleShowDesktop" />
    </keybind>
    <keybind key="W-Left">
      <action name="SnapToEdge" direction="left" combine="yes" />
    </keybind>
    <keybind key="W-Right">
      <action name="SnapToEdge" direction="right" combine="yes" />
    </keybind>
    <keybind key="W-Up">
      <action name="SnapToEdge" direction="up" combine="yes" />
    </keybind>
    <keybind key="W-Down">
      <action name="SnapToEdge" direction="down" combine="yes" />
    </keybind>
    <keybind key="A-Space">
      <action name="ShowMenu" menu="client-menu" atCursor="no" />
    </keybind>

    <!-- Media keys -->
    <keybind key="XF86AudioRaiseVolume"><action name="Execute"><command>noctalia msg volume-up</command></action></keybind>
    <keybind key="XF86AudioLowerVolume"><action name="Execute"><command>noctalia msg volume-down</command></action></keybind>
    <keybind key="XF86AudioMute"><action name="Execute"><command>noctalia msg volume-mute</command></action></keybind>
    <keybind key="XF86MonBrightnessUp"><action name="Execute"><command>noctalia msg brightness-up</command></action></keybind>
    <keybind key="XF86MonBrightnessDown"><action name="Execute"><command>noctalia msg brightness-down</command></action></keybind>

  <!-- SnapToRegion via W-Numpad -->
  <!--
    <keybind key="W-KP_7">
      <action name="SnapToRegion" region="top-left" />
    </keybind>
    <keybind key="W-KP_8">
      <action name="SnapToRegion" region="top" />
    </keybind>
    <keybind key="W-KP_9">
      <action name="SnapToRegion" region="top-right" />
    </keybind>
    <keybind key="W-KP_4">
      <action name="SnapToRegion" region="left" />
    </keybind>
    <keybind key="W-KP_5">
      <action name="SnapToRegion" region="center" />
    </keybind>
    <keybind key="W-KP_6">
      <action name="SnapToRegion" region="right" />
    </keybind>
    <keybind key="W-KP_1">
      <action name="SnapToRegion" region="bottom-left" />
    </keybind>
    <keybind key="W-KP_2">
      <action name="SnapToRegion" region="bottom" />
    </keybind>
    <keybind key="W-KP_3">
      <action name="SnapToRegion" region="bottom-right" />
    </keybind>
  -->
  <!-- keybind for client-list-combined-menu - will center in middle of screen -->
  <!--
    <keybind key="W-Space">
      <action name="ShowMenu" menu="client-list-combined-menu" />
      <position>
        <x>center</x>
        <y>center</y>
      </position>
    </keybind>
  -->

    <keybind key="W-space"><action name="Execute"><command>noctalia msg panel-toggle launcher</command></action></keybind>
    <keybind key="W-n"><action name="Execute"><command>noctalia msg panel-toggle control-center</command></action></keybind>
    <keybind key="W-S-n"><action name="Execute"><command>noctalia msg settings-toggle</command></action></keybind>


  </keyboard>

  <!--
    Multiple <mousebind> can exist within one <context>
    Multiple <actions> can exist within one <mousebind>

    Use <mouse><default /> to load all the default mousebinds (those listed
    below). If the default mousebinds are largely what you want, a sensible
    approach could be to start the <mouse> section with a <default />
    element, and then (re-)define any special binds you need such as launching
    a custom menu when right-clicking on your desktop. See rc.xml for an
    example.
  -->
  <mouse>

    <!-- time is in ms -->
    <doubleClickTime>500</doubleClickTime>

    <context name="Frame">
      <mousebind button="W-Left" action="Press">
        <action name="Focus" />
        <action name="Raise" />
      </mousebind>
      <mousebind button="W-Left" action="Drag">
        <action name="Move" />
      </mousebind>
      <mousebind button="W-Right" action="Press">
        <action name="Focus" />
        <action name="Raise" />
      </mousebind>
      <mousebind button="W-Right" action="Drag">
        <action name="Resize" />
      </mousebind>
    </context>

    <context name="Border">
      <mousebind button="Left" action="Press">
        <action name="Focus" />
        <action name="Raise" />
      </mousebind>
      <mousebind button="Left" action="Drag">
        <action name="Resize" />
      </mousebind>
    </context>

    <context name="TitleBar">
      <mousebind button="Left" action="Press">
        <action name="Focus" />
        <action name="Raise" />
      </mousebind>
      <mousebind button="Right" action="Click">
        <action name="Focus" />
        <action name="Raise" />
      </mousebind>
      <mousebind direction="Up" action="Scroll">
        <action name="Unshade" />
        <action name="Focus" />
      </mousebind>
      <mousebind direction="Down" action="Scroll">
        <action name="Unfocus" />
        <action name="Shade" />
      </mousebind>
    </context>

    <context name="Title">
      <mousebind button="Left" action="Drag">
        <action name="Move" />
      </mousebind>
      <mousebind button="Left" action="DoubleClick">
        <action name="ToggleMaximize" />
      </mousebind>
      <mousebind button="Right" action="Click">
        <action name="ShowMenu" menu="client-menu" />
      </mousebind>
    </context>

    <context name="Maximize">
      <mousebind button="Left" action="Click">
        <action name="ToggleMaximize" />
      </mousebind>
      <mousebind button="Right" action="Click">
        <action name="ToggleMaximize" direction="horizontal" />
      </mousebind>
      <mousebind button="Middle" action="Click">
        <action name="ToggleMaximize" direction="vertical" />
      </mousebind>
    </context>

    <context name="WindowMenu">
      <mousebind button="Left" action="Click">
        <action name="ShowMenu" menu="client-menu" atCursor="no" />
      </mousebind>
      <mousebind button="Right" action="Click">
        <action name="ShowMenu" menu="client-menu" atCursor="no" />
      </mousebind>
    </context>

    <context name="Icon">
      <mousebind button="Left" action="Click">
        <action name="ShowMenu" menu="client-menu" atCursor="no" />
      </mousebind>
      <mousebind button="Right" action="Click">
        <action name="ShowMenu" menu="client-menu" atCursor="no" />
      </mousebind>
    </context>

    <context name="Shade">
      <mousebind button="Left" action="Click">
        <action name="ToggleShade" />
      </mousebind>
    </context>

    <context name="AllDesktops">
      <mousebind button="Left" action="Click">
        <action name="ToggleOmnipresent" />
      </mousebind>
    </context>

    <context name="Iconify">
      <mousebind button="Left" action="Click">
        <action name="Iconify" />
      </mousebind>
    </context>

    <context name="Close">
      <mousebind button="Left" action="Click">
        <action name="Close" />
      </mousebind>
    </context>

    <context name="Client">
      <mousebind button="Left" action="Press">
        <action name="Focus" />
        <action name="Raise" />
      </mousebind>
      <mousebind button="Middle" action="Press">
        <action name="Focus" />
        <action name="Raise" />
      </mousebind>
      <mousebind button="Right" action="Press">
        <action name="Focus" />
        <action name="Raise" />
      </mousebind>
    </context>

    <context name="Root">
      <mousebind button="Left" action="Press">
        <action name="ShowMenu" menu="root-menu" />
      </mousebind>
      <mousebind button="Right" action="Press">
        <action name="ShowMenu" menu="root-menu" />
      </mousebind>
      <mousebind button="Middle" action="Press">
        <action name="ShowMenu" menu="root-menu" />
        <!-- openbox default, swap with above line to activate -->
        <!-- <action name="ShowMenu" menu="client-list-combined-menu" /> -->
      </mousebind>
      <mousebind direction="Up" action="Scroll">
        <action name="GoToDesktop" to="left" wrap="yes" />
      </mousebind>
      <mousebind direction="Down" action="Scroll">
        <action name="GoToDesktop" to="right" wrap="yes" />
      </mousebind>
    </context>

  </mouse>

  <!--
    A touch configuration can be bound to a specific device. If device
    name is left empty, the touch configuration applies to all touch
    devices or functions as a fallback. Multiple touch configurations
    can exist.
    See the libinput device section for obtaining the device names.

    Direct cursor movement to a specified output. If the compositor is
    running in nested mode, this does not take effect.

    If mouseEmulation is enabled, all touch up/down/motion events are
    translated to mouse button and motion events.
  -->
  <touch>
    <!-- <deviceName>ELAN2514:00 04F3:2AF1<deviceName> -->
    <!-- <mapToOutput>HDMI-A-1</mapToOutput> -->
    <mouseEmulation>no</mouseEmulation>
  </touch>

  <!--
    The tablet cursor movement can be restricted to a single output.
    If output is left empty or the output does not exists, the tablet
    will span all outputs.

    The tablet orientation can be changed in 90 degree steps, thus
    *rotate* can be set to [0|90|180|270]. Rotation will be applied
    after applying tablet area transformation.

    The active tablet area can be specified by setting the *top*/*left*
    coordinate (in mm) and/or *width*/*height* (in mm). If width or
    height are omitted or default (0.0), width/height will be set to
    the remaining width/height seen from top/left.

    The tablet can be forced to always use mouse emulation. This prevents
    tablet specific restrictions, e.g. no support for drag&drop, but also
    omits tablet specific features like reporting pen pressure.

    Pen buttons emulate regular mouse buttons. The pen *button* can be any
    of [Stylus|Stylus2|Stylus3] and can be mapped to mouse buttons
    [Right|Middle|Side]. Tablet pad buttons [Pad|Pad2|Pad3|..|Pad9] also
    emulate regular mouse buttons and can be mapped to any mouse button.
    When using mouse emulation, the pen tip [tip] and the stylus buttons
    can be set to any available mouse button [Left|Right|Middle|..|Task].
  -->
  <tablet rotate="0" mouseEmulation="no">
    <!-- <mapToOutput>HDMI-A-1</mapToOutput> -->
    <!-- Active area dimensions are in mm -->
    <area top="0.0" left="0.0" width="0.0" height="0.0" />
    <map button="Tip" to="Left" />
    <map button="Stylus" to="Right" />
    <map button="Stylus2" to="Middle" />
  </tablet>

  <!--
    All tablet tools, except of type mouse and lens, use absolute
    positioning by default. The *motion* attribute allows to set tools
    to relative motion instead. When using relative motion,
    *relativeMotionSensitivity* controls the speed of the cursor. Using
    a value lower than 1.0 decreases the speed, using a value greater than
    1.0 increases the speed of the cursor.
    The pressure range of a tablet tool can be controlled by adjusting
    *minPressure* and *maxPressure*.
  -->
  <tabletTool motion="absolute" relativeMotionSensitivity="1.0"
              minPressure="0.0" maxPressure="1.0" />

  <!--
    The *category* attribute is optional and can be set to touch, touchpad,
    non-touch, default or the name of a device. You can obtain device names by
    running *libinput list-devices* as root or member of the input group.

    Tap is set to *yes* by default. All others are left blank in order to use
    device defaults.

    All values are [yes|no] except for:
      - pointerSpeed [-1.0 to 1.0]
      - accelProfile [flat|adaptive|custom]
      - tapButtonMap [lrm|lmr]
      - clickMethod [none|buttonAreas|clickfinger]
      - clickfingerButtonMap [lrm|lmr]
      - scrollMethod [twoFinger|edge|onbutton|none]
      - sendEventsMode [yes|no|disabledOnExternalMouse]
      - calibrationMatrix [six float values split by space]
      - scrollFactor [float]

    The following <libinput>...</libinput> block may not be complete for
    your requirements. Default values are device specific. Only set an option
    if you require to override the default. Valid values must be inserted.

  -->

  <libinput>
    <device category="default">
      <!-- <naturalScroll>no</naturalScroll> -->
      <!-- <leftHanded>no</leftHanded> -->
      <!-- <pointerSpeed>0.0</pointerSpeed> -->
      <!-- <accelProfile>adaptive</accelProfile> -->
      <tap>yes</tap>
      <!-- <tapButtonMap>lrm</tapButtonMap> -->
      <!-- <tapAndDrag>yes</tapAndDrag> -->
      <!-- <dragLock>yes</dragLock> -->
      <!-- <threeFingerDrag>yes</threeFingerDrag> -->
      <!-- <middleEmulation>no</middleEmulation> -->
      <!-- <disableWhileTyping>yes</disableWhileTyping> -->
      <!-- <clickMethod>buttonAreas</clickMethod> -->
      <!-- <clickfingerButtonMap>lrm</clickfingerButtonMap> -->
      <!-- <scrollMethod>twofinger</scrollMethod> -->
      <!-- <scrollButton>274</scrollButton> -->
      <!-- <sendEventsMode>yes</sendEventsMode> -->
      <!-- <calibrationMatrix>1 0 0 0 1 0</calibrationMatrix> -->
      <scrollFactor>1.0</scrollFactor>
      <!--
        Opt-in example tuned on a Dell XPS 15 9520 for precise low-speed
        two-finger scrolling while retaining responsive faster scrolling.
        Values are device- and user-specific, not universal defaults.
        Motion and Fallback remain 1:1, not adaptive-profile equivalents.
        Points specify output speed; step specifies input-speed spacing in
        device units/ms. Curves are ignored unless accelProfile is custom.
        pointerSpeed has no effect with custom. Missing Motion/Scroll uses
        Fallback; missing Fallback means no acceleration.
        <accelProfile>custom</accelProfile>
        <motionCurve step="1" points="0 1" />
        <scrollCurve step="0.10" points="0 0.015 0.040 0.075 0.120 0.210 0.348 0.546 0.800 0.990 1.100" />
        <fallbackCurve step="1" points="0 1" />
      -->
    </device>
  </libinput>

  <!--
    # Window Rules
    #   - Criteria can consist of 'identifier', 'title', 'sandboxEngine' or
    #     'sandboxAppId'. AND logic is used when multiple options are specified.
    #   - 'identifier' relates to app_id for native Wayland windows and
    #     WM_CLASS for XWayland clients.
    #   - Criteria can also contain `matchOnce="true"` meaning that the rule
    #     must only apply to the first instance of the window with that
    #     particular 'identifier' or 'title'.
    #   - Matching is case-insensitive and is performed using shell wildcard
    #     patterns (see glob(7)) so '\*' (not between brackets) matches any
    #     string and '?' matches any single character.

    <windowRules>
      <windowRule identifier="*"><action name="Maximize" /></windowRule>
      <windowRule identifier="foo" serverDecoration="yes" />
      <windowRule title="bar" serverDecoration="yes" />
      <windowRule identifier="baz" title="quax" serverDecoration="yes" />
    </windowRules>

    # Example below for `lxqt-panel` and `pcmanfm-qt \-\-desktop`
    # where 'matchOnce' is used to avoid applying rule to the panel
    # configuration window with the same 'app_id'.

    <windowRules>
      <windowRule identifier="lxqt-panel" matchOnce="true">
        <skipTaskbar>yes</skipTaskbar>
        <action name="MoveTo" x="0" y="0" />
        <action name="ToggleAlwaysOnTop" />
      </windowRule>
      <windowRule title="pcmanfm-desktop*">
        <skipTaskbar>yes</skipTaskbar>
        <skipWindowSwitcher>yes</skipWindowSwitcher>
        <fixedPosition>yes</fixedPosition>
        <action name="MoveTo" x="0" y="0" />
        <action name="ToggleAlwaysOnBottom" />
      </windowRule>
      <windowRule identifier="org.qutebrowser.qutebrowser">
        <action name="ResizeTo" width="1024" height="800" />
        <action name="AutoPlace" />
      </windowRule>
    </windowRules>
  -->

  <menu>
    <ignoreButtonReleasePeriod>250</ignoreButtonReleasePeriod>
    <showIcons>yes</showIcons>
  </menu>

  <!--
    Magnifier settings
    'width' sets the width in pixels of the magnifier window.
    'height' sets the height in pixels of the magnifier window.
    'initScale' sets the initial magnification factor at boot.
    'increment' sets the amount by which the magnification factor
      changes when 'ZoomIn' or 'ZoomOut' are called.
    'useFilter' sets whether to use a bilinear filter on the magnified
      output or simply to take nearest pixel.
  -->
  <magnifier>
    <width>400</width>
    <height>400</height>
    <initScale>2.0</initScale>
    <increment>0.2</increment>
    <useFilter>yes</useFilter>
  </magnifier>

</labwc_config>
Noctalia Greeter:
Leave the /etc/greetd/ files alone, it's correct that the user is "_greetd". Add 'greeter' to the video group...
sudo useradd -M -G video greeterFix permissions on the greetd folder...
sudo chmod -R go+r /etc/greetd/Reboot. If my instructions are right, you should have a login window and then a labwc session. If you've copied my rc.xml, the following keybinds will let you open the Noctalia panels so you can start configuring. Be sure you go to the 'Security>Authentication' tab in the settings window and enable Noctalia's polkit (and reboot)...
    <keybind key="W-space"><action name="Execute"><command>noctalia msg panel-toggle launcher</command></action></keybind>
    <keybind key="W-n"><action name="Execute"><command>noctalia msg panel-toggle control-center</command></action></keybind>
    <keybind key="W-S-n"><action name="Execute"><command>noctalia msg settings-toggle</command></action></keybind>
I need to set up a VM or another partition, I'm posting this based off of my notes and memory. Let me know if it works for you or not.
Why why why why?!!???
Offline
#2 2026-09-16 23:24:10
- hhh
- Hercule Poirot
- From: Belgium
- Registered: 2015-09-17
- Posts: 17,479
- Website
Re: (Wayland) Setup Noctalia, a shell for labwc, niri, mangowm, etc...
Pic or it didn't happen...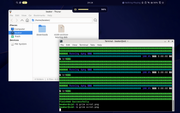
In a VM, I installed the forky netinstall ISO, chose no desktop environment, changed sources and upgraded to sid in the new OS, then ran...
sudo apt install labwc firefox thunar thunar-archive-plugin mousepad xfce4-terminal pkexec xwayland xdg-dekstop-portal-gtk xdg-desktop-portal-wlrThen finished the tutorial and rebooted. Joy.
Very sparse, polkit isn't enabled in noctalia-settings yet, I have no fonts, no xdg-user-dirs, nothing is properly themed, my resolution is wrong, but my volume and work perfectly! Look at that OSD, baby!
I'll post some config tips later. Cheers.
Why why why why?!!???
Offline
#3 Yesterday 01:41:50
- hhh
- Hercule Poirot
- From: Belgium
- Registered: 2015-09-17
- Posts: 17,479
- Website
Re: (Wayland) Setup Noctalia, a shell for labwc, niri, mangowm, etc...
Allright, I've installed xdg-user-dirs and ran xdg-user-dirs-update. I've set up workspaces in labwc/rc.xml. I've installed fonts-noto and fonts-recommended. I've temporarily set screen resolution via wdisplays (install it). labwc doesn't have an output section in its config for setting displays (-edit- set it via autostart, my bad)? Anyway, temporary is fine, I'm in a VM. I've removed rounded corners in labwc, I hate that half round/half-square look.
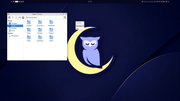
Real quickly, some theming. Install papirus-icon-theme via apt. Extract awd-gtk3 and awd-gtk3-dark from here and move the 2 folders to !/.local/share/themes (create the folder)...
https://github.com/lassekongo83/adw-gtk … 6.5.tar.xz
Download a wallpaper, why not the 2 new Mac OS 27 ones, put them in ~/Pictures for now...
https://media.512pixels.net/downloads/m … n-Gate.png
https://media.512pixels.net/downloads/m … e-Dark.png


Open the Noctalia settings panel, W is the super/mod/Windows key... (W+Shift+n). In the sidepane click 'Wallpaper'>General>Open Panel.
Click a wall. Switch "Built-in" to "Wallpaper". Click the shortcut again or Esc to exit the wall panel.
Click 'Templates' in the Sidepane of the settings window. Enable alacritty, both GTKs, QT and labwc to start. Next tab...
Click 'Security'>Authentication>Polkit Agent>Enable. You need to reboot for the polkit to activate.
Why why why why?!!???
Offline
#4 Yesterday 02:57:42
- hhh
- Hercule Poirot
- From: Belgium
- Registered: 2015-09-17
- Posts: 17,479
- Website
Re: (Wayland) Setup Noctalia, a shell for labwc, niri, mangowm, etc...
Now open the settings window, type "sync', you'll see Security>Greeter>Sync Now. Click it, enter your password.
Set up qt apps...
sudo apt install qt5ct qt6ctOpen your ~/.profile file and export the environment variable by adding it to the bottom...
export QT_QPA_PLATFORMTHEME=qt5ctLogout, admire your greeter, login, open the launcher menu (W+Space), type 'qt5'. open Qt5 Settings, set Color Scheme: noctalia, switch to the fonts tab and set your fonts, do the same in Qt6 Settings done.
To color icons, start by installing papirus-folders...
wget -qO- https://git.io/papirus-folders-install | shHere's the uninstall code, so you know (it's on their github page)
wget -qO- https://git.io/papirus-folders-install | env uninstall=true shList available colors...
papirus-folders -lSet a color...
papirus-folders -C brown -t PapirusBetter...
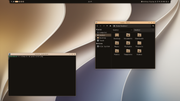
Why why why why?!!???
Offline
#5 Yesterday 03:48:09
- hhh
- Hercule Poirot
- From: Belgium
- Registered: 2015-09-17
- Posts: 17,479
- Website
Re: (Wayland) Setup Noctalia, a shell for labwc, niri, mangowm, etc...
Set up term colors:
https://docs.noctalia.dev/noctalia/temp … templates/
Use "or step-by-step"...
Create ~/.config/noctalia/config.toml
[theme.templates.user.terminal-sequences]
input_path = '~/.config/noctalia/templates/terminal-sequences'
output_path = '~/.cache/terminal-sequences'
post_hook = 'tee /dev/pts/[0-9]* < ~/.cache/terminal-sequences'
Generate the code by copy/pasting this into a terminal...
#!/usr/bin/env bash

TEMPLATE_PATH=~/.config/noctalia/templates/terminal-sequences

mkdir -p ~/.config/noctalia/templates

{
    printf '\033]10;{{colors.terminal_foreground.default.hex}}\007'
    printf '\033]11;{{colors.terminal_background.default.hex}}\007'

    printf '\033]4;0;{{colors.terminal_normal_black.default.hex}}\007'
    printf '\033]4;1;{{colors.terminal_normal_red.default.hex}}\007'
    printf '\033]4;2;{{colors.terminal_normal_green.default.hex}}\007'
    printf '\033]4;3;{{colors.terminal_normal_yellow.default.hex}}\007'
    printf '\033]4;4;{{colors.terminal_normal_blue.default.hex}}\007'
    printf '\033]4;5;{{colors.terminal_normal_magenta.default.hex}}\007'
    printf '\033]4;6;{{colors.terminal_normal_cyan.default.hex}}\007'
    printf '\033]4;7;{{colors.terminal_normal_white.default.hex}}\007'

    printf '\033]4;8;{{colors.terminal_bright_black.default.hex}}\007'
    printf '\033]4;9;{{colors.terminal_bright_red.default.hex}}\007'
    printf '\033]4;10;{{colors.terminal_bright_green.default.hex}}\007'
    printf '\033]4;11;{{colors.terminal_bright_yellow.default.hex}}\007'
    printf '\033]4;12;{{colors.terminal_bright_blue.default.hex}}\007'
    printf '\033]4;13;{{colors.terminal_bright_magenta.default.hex}}\007'
    printf '\033]4;14;{{colors.terminal_bright_cyan.default.hex}}\007'
    printf '\033]4;15;{{colors.terminal_bright_white.default.hex}}\007'

    printf '\033]19;{{colors.terminal_selection_fg.default.hex}}\007'
    printf '\033]17;{{colors.terminal_selection_bg.default.hex}}\007'
    printf '\033]12;{{colors.terminal_cursor.default.hex}}\007'
} > "$TEMPLATE_PATH"
Add the following to the bottom of ~/.bashrc...
[[ -f ~/.cache/terminal-sequences ]] && cat ~/.cache/terminal-sequencesWhy why why why?!!???
Offline
#6 Yesterday 22:22:14
- DeepDayze
- Like sands through an hourglass...
- From: In Linux Land
- Registered: 2017-05-28
- Posts: 1,996
Re: (Wayland) Setup Noctalia, a shell for labwc, niri, mangowm, etc...
This sure is looking good! Going to try setting this up on a test machine
Real Men Use Linux
Offline
#7 Yesterday 23:52:07
- hhh
- Hercule Poirot
- From: Belgium
- Registered: 2015-09-17
- Posts: 17,479
- Website
Re: (Wayland) Setup Noctalia, a shell for labwc, niri, mangowm, etc...
^ Let us know how it goes!
Why why why why?!!???
Offline
#8 Today 07:54:02
- unklar
- Back to the roots 1.9

- From: #! BL
- Registered: 2015-10-31
- Posts: 3,090
Re: (Wayland) Setup Noctalia, a shell for labwc, niri, mangowm, etc...
^ Let us know how it goes!
 +1
+1
@hhh,
Thanks for your work!
Unfortunately, you're going way too fast for me, and I can't follow along. Also, I'm still not sure whether to do a fresh installation or use my existing 'labwc's'. 
Online